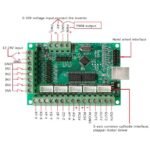
Specification :
- Part Number: BL-USBMach V2.0
- No of Axis: 5 (you can connect 5 stepper motor drives or servo drives)
- Maximum step-pulse frequency: 100KHz (suitable for smooth servo or stepper motion)
- Automatic probe tool Support: Yes
- Emergency input: Yes
- Limit switches: Yes (5 general-purpose inputs, you can connect the limit switch, estop switch, probe switch, back to zero and other device)
- Electronic handwheel Support: Yes
- Optical Isolation between USB Side Control and External inputs: Yes
- External Voltage: 12V/24V
- Spindle Control Output: Yes (0-10V output port) with Spindle Direction (FWD) output
- Isolated Outputs: 4 general-purpose isolated relay drive output interface (can drive four relays for controlling the spindle starts, forward rotating and reverse rotating, pumps and other device)
- Power Status LED: 1 Status LED (indicate Power status of the controller board)
- Size: 9x6cm / 3.54×2.36in
- Tested with following Operating Systems:Windows XP (direct)
- Windows 7 64bit /32Bit (direct)
- Windows 10 (Indirect using Windows XP on VmWare
Packing Include :
1X MACH3 USB interface board 5 Axis BL-UsbMach-V2.0 MACH3 CNC Board
Setup Instructions:
- Step 1: Install Mach3: If you already have a Mach3 Installed, skip this step.
- Step 2: Download the USB Motion Driver BL-UsbMach-V22.dll and copy and paste the file into your Mach3 Plugins folder Example: “C:/Users/ProgramFiles/Mach3/Plugins”
- Step 3: Make sure your board is connected to the PC via USB cable. It should automatically recognize the USB device.
- Step 4: Open Mach3 and you should be prompted to select a driver. Select the “USBMach V2.0” and check “Don’t ask me again”. This will allow your board to communicate with Mach3.
- Step 5: Download the XML Mach3 Config File above by right-clicking on the link and selecting “save as”. Save the Mach3Mill.xml file in your Mach3 root folder.
Reviews
There are no reviews yet