


Breadboard Price in Pakistan: 7 Buying Checks

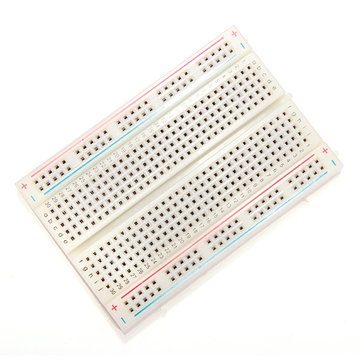
Breadboard price in Pakistan depends on board size, contact quality and what the package actually includes. A miniature solderless board, a larger board and a plug-in power module serve different purposes. Buying by the lowest price alone can leave too little space for a useful circuit.
This guide compares Epro listings and explains how to select a low-voltage prototyping setup. Prices are a dated catalog snapshot; the guide does not claim that the listed boards have been independently tested for contact resistance or service life.

Breadboard price in Pakistan: compare like with like
| Listed item | Listed price (PKR) | Role |
|---|---|---|
| SYB-170 Mini Breadboard Solderless 170 Holes 4.5×3.5CM | 70 | Mini 170-hole board |
| 400 Holes Solderless Breadboard Bread Board MB102 | 160 | 400-hole board |
| Breadboard Solderless Project Board GL No. 12 in Pakistan | 250 | Solderless GL No.12 board |
| Breadboard Dedicated Power Supply Module Compatible 5V, 3.3V | 200 | 3.3 V / 5 V power module, not a breadboard |
| 1set Jump Wire Cable Male to Male Jumper Wire for Breadboard 65 PCS jumper wires | 220 | Jumper wire set, not a breadboard |
Price check: Epro listings checked on 18 October 2026. Prices are a dated snapshot, not a quotation. Confirm the current price, availability, delivery charges and package contents on the linked product page before ordering.
Check the package description before adding accessories. A photograph may show a mounted power module or connected wires for illustration. The GL No.12 model name alone does not establish a particular tie-point count, so verify its dimensions and internal arrangement instead of assuming it is identical to a familiar full-size board.
1. Choose space for the actual circuit
A 170-hole mini board can suit a few components or a compact demonstration, but it may lack separate power rails. A 400-point board gives more working area for an introductory sensor circuit. Larger projects need space not only for parts but also for readable wiring and access to component labels.
Sketch the layout before purchasing. A wide microcontroller board can cover most usable contact rows and leave no room for wires. In that case, a larger layout or separate interconnect method may be more practical than simply choosing the cheapest board.
2. Understand what a tie point means
A tie point is a socket position, not an independent electrical node. Groups of sockets are connected internally. On a common board, a group of five holes shares a metal strip, while the centre gap separates the left and right groups. Power rails use a different connection pattern and may be split partway along the board.
Printed red and blue lines are guides, not automatic voltage supplies. Use an unpowered continuity test to identify the connections before relying on a new board. The breadboard connections guide shows how that affects a first LED circuit.
Newest in the store


3. Buy suitable jumper wires
Male-to-male jumpers generally connect breadboard sockets to other sockets or female headers. A sensor with exposed male header pins may instead need female-ended wires for part of the connection. Count the actual connections and choose the right ends, rather than assuming one mixed bundle will always fit.
Keep wire lengths sensible and avoid forcing oversized leads into the contacts. A damaged spring contact can cause intermittent faults that look like coding errors. For a clean beginner layout, use consistent wire colours for supply and ground and keep signal wires separate enough to trace.
4. Check power-module compatibility
The breadboard power module listing describes selectable 3.3 V and 5 V outputs and several input options. Verify its physical pin spacing, jumper settings and polarity before plugging it into a board. Not every small breadboard has rails positioned to accept the same module.
Check the voltage with a meter before connecting an ESP32, sensor or other sensitive load. A regulator’s advertised maximum current is not a guarantee of continuous output under every input voltage and cooling condition. Linear regulators can become hot as the input-to-output voltage difference and current increase.
5. Stay within low-voltage prototype use
A solderless board is not a suitable place for mains wiring or high motor currents. Loose contacts and thin interconnects can create heating and voltage drop. Use a properly designed power path for motors, heaters and other substantial loads; keep the breadboard for appropriate signal-level learning circuits.
6. Inspect build quality on arrival
Check that contacts grip appropriate leads without excessive force, the board sits flat and the adhesive backing is intact if included. Test several rows and rail segments before building a complex circuit. Do not bridge two different power rails simply because their printed colours appear similar.
7. Start with an inexpensive verification circuit
A current-limited LED circuit is a useful first check before adding a microcontroller. Follow the breadboard LED and connection tutorial and consult SparkFun’s breadboard reference for internal connection patterns. Once the board is verified, add one subsystem at a time so wiring faults remain easy to isolate.